
Just in case you missed it -- we’re here to let you in on the latest news!
We have recently introduced Rate Expressions as a new (and really simple!) means for scheduling jobs in Cron To Go.
Many of you are probably used to scheduling your jobs using good old Cron Expressions, which is great, no doubt. But if you’re into keeping it simple, you ought to check out Rate Expressions.
Rate Expressions are simple and easy to understand, and work great for many use cases. Their secret is that as opposed to Cron Expressions, Rate Expressions use simple terms for scheduling. Sure, it’s true that Rate Expressions may not be as flexible as Cron expressions, but what they can do is define some schedules that are harder to define with Cron.
Find out more about Rate Expressions below⬇️

What are rate expressions?
Rate expressions are an easy way to schedule jobs on your Heroku applications. Thay are composed of a numeric value and a time measurement unit.
Some examples:
- Every 5 minutes
- Every 2 days
- Every 3 hours
In addition, an anchor time or start time is also set in order to define when to run the job commands.
For instance:
A job with the rate expression “Every 5 minutes” that starts at October 19, 2023, 10:30, would run at 10:30, 10:35, 10:40, etc., while a job with the same rate expression (“Every 5 minutes”) that starts at October 19, 2023 10:32, would run at 10:32, 10:37, 10:42, etc.
What can Rate Expressions do that Cron Expressions can’t?
“Anything you can do, I can do simpler”, said Rate Expressions to Cron Expressions. Well, that’s not entirely true, but there are some things that one can achieve using Rate Expressions that can’t be done using Cron Expressions, for example:
Many rate expressions have an equivalent cron expression. For instance: “every 5 minutes” in a cron expression is */5 * * * *. However, cron expressions can’t really do intervals such as “every 21 minutes” because the expression */21 * * * * would trigger jobs to run at 00:00, 00:21, 00:42, 01:00, 00:21, 00:42. The same goes for “every 2 days”.
#Bonus - Check out some great tricks that will help you bypass some of Cron’s limitations in this super helpful post: What Cron Can't Do and How To Do It Anyway.
What can Cron Expressions do that Rate Expressions can’t?
Ask any rhythmic gymnast and they'll tell you: it’s all about flexibility. And no one is more flexible than Cron Expressions. A single cron expression can define a job that runs at 9am, 12pm and 8pm every Monday, Thursday, and Saturday.
Don’t believe it? Check this out: 0 9,12,20 * * 1,4,6.
Cron Expressions let you combine minutes, hours of day, day of month, months, day of weeks and in all sorts of cool ways. Want to learn more about them? Check out our complete guide to Cron Expressions.

And for the “Learn how to” part:
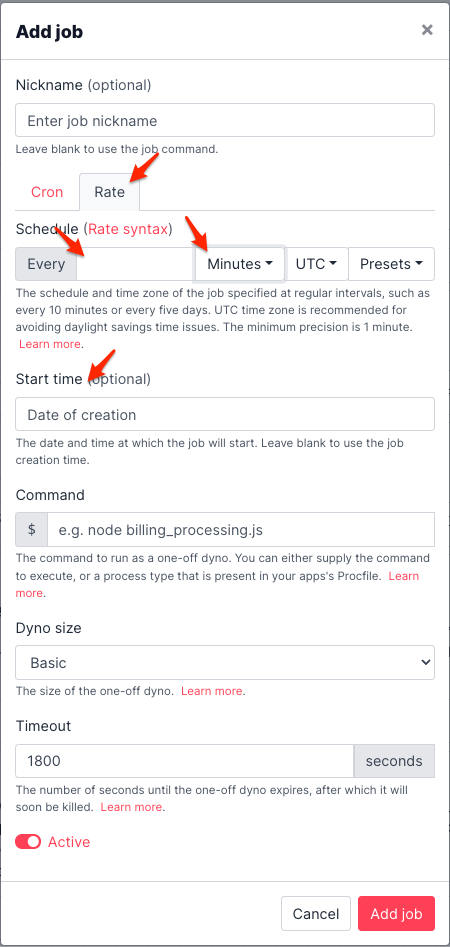
How to use Rate Expressions in Cron To Go
- Open the Cron To Go dashboard.
- Click “Add job”.
- Name your job.
- Click “Rate” to switch from “Cron” to “Rate” expressions.
- Enter the numeric rate and select the interval (minutes, hours, or days). For example: 5 and minutes to schedule every 5 minutes. You can also use the presets for frequently used rate expressions.
- Enter the start time. If you leave it empty, the start time is the job’s creation time.
- Enter the command to run. Cron To Go will trigger a one-off dyno in your app with this command according to the rate expression you enter.
- Select the dyno size (this should match the dyno sizes available to your app)
- Optionally change your job’s timeout (the default is 1,800 seconds) - after which, Heroku will terminate the job’s one-off dyno.
- Click “Add job” to create the new job.
How to switch from Cron Expressions to Rate Expressions
- Click the job’s menu button (...) and then “edit job”.
- In the edit job dialog, click “Rate” and follow the instructions above.
- Click “Save job”.
How to switch from Rate Expressions to Cron Expressions
- Click the job’s menu button (...) and then “edit job”.
- In the edit job dialog, click “Cron”, enter your cron expression, use presets for help or Cron Expression To Go to build your cron expression.
- Click “Save job”.
If you’ve come this far, you should be all good and ready to utilize Rate Expressions and enjoy an easy breezy scheduling fun-time. You’re welcome!