
Here’s a scenario: You have an app active on Heroku, either by deploying your own code or one of the nifty Heroku Buttons provided in the Elements Marketplace (Ghost CMS, Wordpress, etc.). You have attached a MySQL add-on (JawsDB or ClearDB for example) in order to store data such as blog posts, users, transactions, and more .So far, your app has been received well; there’s some traffic, traction, feedback, and users are loving the experience. Now it’s time to just sit back and relax, right? On the contrary! Before you loosen your reins, we suggest that you ensure your database is backed up properly.
What do you need for backup?
Did you know that all really good recipes only consist of 3 main ingredients? While this fact is completely made up, the recipe for a good backup indeed only requires the following 3 factors:
- A program to perform backups through.
- A secure and reliable storage for your backups.
- A scheduling mechanism to perform regular backups.
1. Backup program
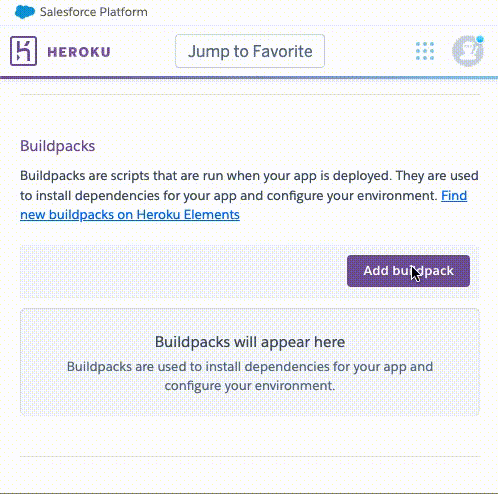
To backup mysql, you can use this sweet client app called mysqldump, which creates a backup file that you can use to restore your database. To add the option of utilizing mysqldump within your Heroku app, add a buildpack to the app. You can do so either by using the Heroku CLI (Make sure to install & configure the Heroku CLI first) or through the Heroku dashboard.
To add the buildpack using the CLI simply run the following command:
heroku buildpacks:add https://github.com/crazyantlabs/heroku-buildpack-mysql-client <-a [your app name]>Or, for the dashboard option, go to your app dashboard, click Settings, scroll to Buildpacks and add a new buildpack:
https://github.com/crazyantlabs/heroku-buildpack-mysql-clientNext, make some dummy changes to your app, commit, and push them to Heroku for the buildpack changes to take effect.
2. Reliable Backup Storage
Once you have a backup file, the one thing you don’t want to do is to misplace it. For reliable storage, SFTP To Go has got your back…..ups. It utilizes Amazon S3 as its storage layer, which is the most scalable and durable storage on the cloud, and enables secure file access via SFTP, FTPS, or the S3 protocols.
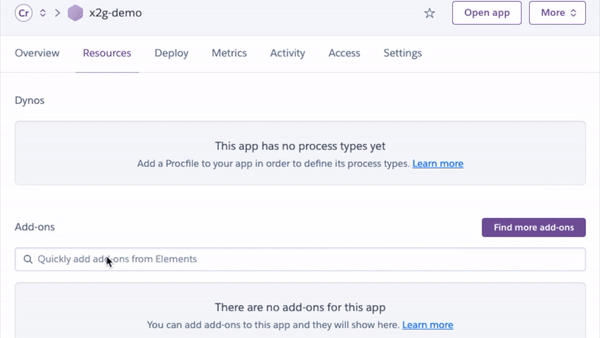
SFTP To Go is also an Heroku add-on so there is no need to sign up or further provide billing information - simply add it to your app through the Heroku dashboard or use the CLI.
To add it using the CLI, run the following command:
heroku addons:create sftptogo:bronze <-a [your app name]>Or, for the dashboard option:

Once installed, you will gain immediate access to the storage and the root credentials are exposed to your app using the environment variable SFTPTOGO_URL, which will soon be used to upload files to.
3. Backup Scheduling
To schedule backups, we’ll use Cron To Go: a production grade cloud scheduler that’s reliable and flexible. Depending on your use case, you may want to use it to schedule your backups once an hour, twice a day, once a week, or following any other schedule.
Cron To Go is a Heroku add-on so again, it is not necessary to sign up - simply add it to your app through your Heroku dashboard or the CLI.
To add it using the CLI, run the following command:
heroku addons:create crontogo:bronze <-a [your app name]>Or, add it through the dashboard:
Mixing it all up
Now that we’ve prepped all of the ingredients, let’s put them to work!
After you install Cron To Go, find it under your app’s resources tab and click it to open the dashboard. Then, add a new job to backup your database:
- Name it “DB Backup”.
- Use whatever schedule fits your requirements (for example,
0 0 * * *to run at midnight UTC every day). - Use the following command to backup your database, gzip it, and then upload the file to SFTP To Go:
proto="$(echo $JAWSDB_URL | grep :// | sed -e's,^\(.*://\).*,\1,g')"
url=$(echo $JAWSDB_URL | sed -e s,$proto,,g)
userpass="$(echo $url | grep @ | cut -d@ -f1)"
pass="$(echo $userpass | grep : | cut -d: -f2)"
user="$(echo $userpass | grep : | cut -d: -f1)"
hostport=$(echo $url | sed -e s,$userpass@,,g | cut -d/ -f1)
host="$(echo $hostport | sed -e 's,:.*,,g')"
port="$(echo $hostport | sed -e 's,^.*:,:,g' -e 's,.*:\([0-9]*\).*,\1,g' -e 's,[^0-9],,g')"
db="$(echo $url | grep / | cut -d/ -f2-)"
echo "[mysqldump]" > .my.cnf
echo "password="$pass >> .my.cnf
bin/mysqldump --single-transaction -u $user -h $host $db | gzip | curl -vvv -k ${SFTPTOGO_URL}/mysql-backups/mysqldump-${db}-`date '+%Y%m%d-%H%M%S'`.sql.gz -T - --create-dirs
What this longish command does is:
- Lines 1-11: Break the
JAWSDB_URLenvironment variable down to its parts in order to pass it to themysqldumpcommand. It stores the password in a temporary file formysqldumpto use without exposing it in the logs. If you’re using the ClearDB add-on, replaceJAWSDB_URLwithCLEARDB_DATABASE_URL). - Line 12: Run
mysqldumpwith the connection string arguments to backup the database, pipe the output togzipwhich compresses the backups and pipes the compressed output to curl in order to upload the compressed backup to your cloud storage on SFTP To Go. - The filename created on SFTP To Go contains the database name and the date and time in which the backup was created for you to quickly find any database backup.
You can manually run the job by clicking the menu button (...) for the job and then selecting “Run job now”. Next, connect to your SFTP storage using your favorite client (Filezilla, Cyberduck, Transmit, or good old SFTP command line), and find your backup file!
How do I restore a backup?
You didn’t think we’d leave you with just the backups, right?
It is also important to know how to restore a backup, and for that process, you can use the following command to first download and decompress the backup. Simply replace <backup file> with the the name of the backup file you’d like to restore:
curl ${SFTPTOGO_URL}/mysql-backups/mysqldump-yc37stkglltvj93e-20220803-164457.sql.gz | gzip -d > backup.sqlThen use the mysql command to restore the backup by running the sql commands within the file to a new host and/or database. You will be prompted for the password:
mysql -u [user name] -h [host name] –p [target_database_name] < backup.sqlWith this guide, you can unwind and feel secure doing so. This recipe definitely doesn't call for disaster!