Cron To Go has become Heroku’s most popular production-grade scheduler for background jobs and tasks. It provides the user the ability to add jobs manually using Cron To Go’s dashboard, or by using the Cron To Go CLI. With that being said, it is recommended that you configure your jobs as part of your code to ensure that changes to your jobs occur when you deploy your code to Heroku.
In this post, we’ll go through the steps required for the configuration process of jobs using configuration as code.
For those of you who prefer a video tutorial:
Step 1 - Install Cron To Go, the scheduler add-on
If you haven’t already done so, now is the time to install Cron To Go in your app - Heroku’s fully-managed, reliable, flexible, and scalable cloud scheduling add-on.
To install Cron To Go in your app, you can use the Heroku CLI (install it first!):
heroku addons:create crontogo -a <your-app-name>
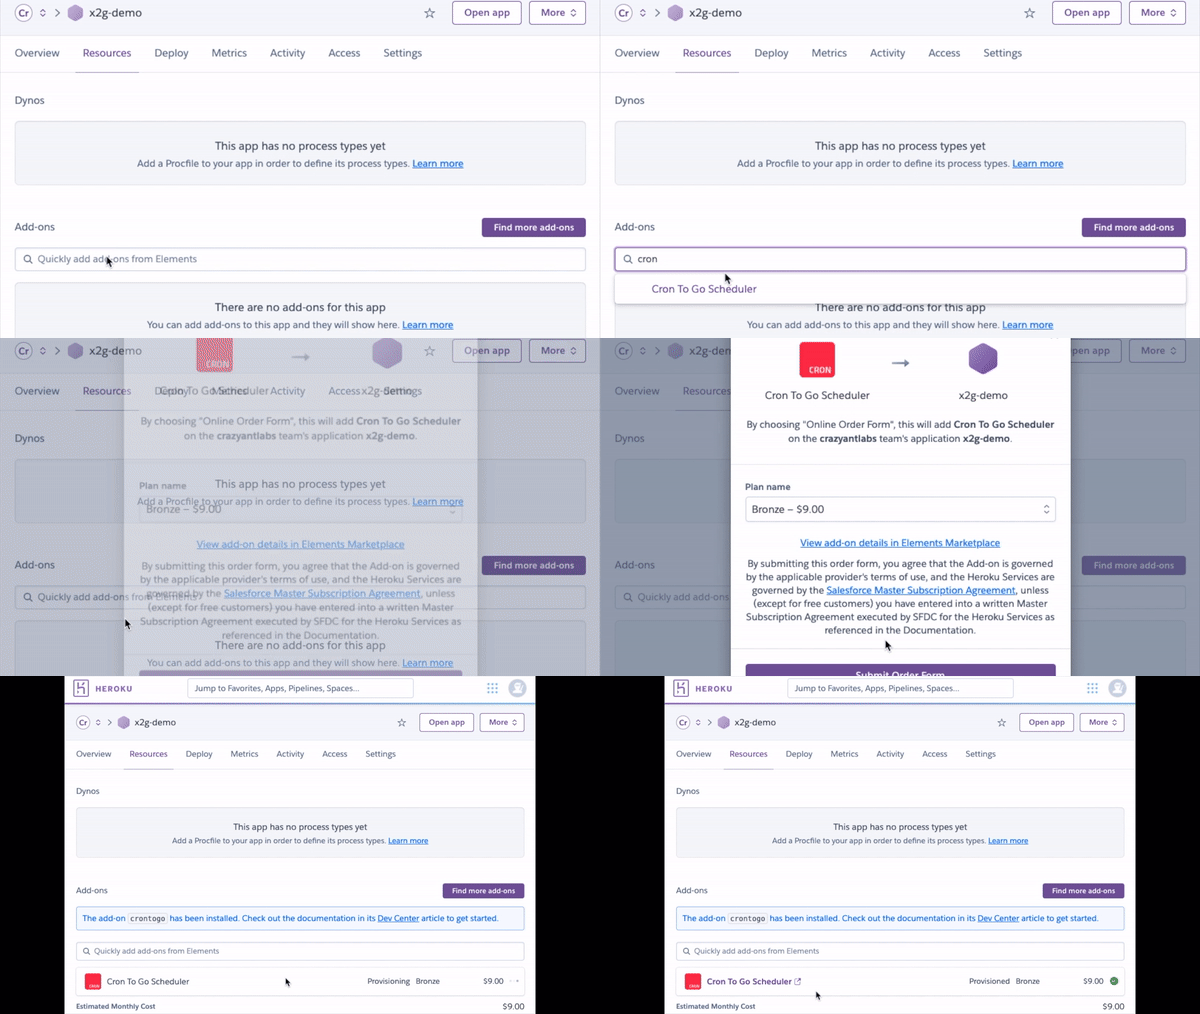
Another option is to follow these steps through the UI:

Step 2 - Add the Cron To Go CLI buildpack to your Heroku app
The Cron To Go CLI buildpack allows you to run the Heroku CLI using the Cron To Go plugin. The powerful import command is responsible for most of the magic.
Prior to adding the Heroku CLI buildpack, it is important to make sure you have the Heroku CLI installed locally, as we’ll be using it to add the buildpack. Run the following commands to add the buildpack to your app:
heroku buildpacks:add crazyantlabs/heroku-buildpack-cli-plugin-cron
git push heroku main
Then, add an environment variable that contains your Heroku API key. Note that this will override an existing HEROKU_API_KEY environment variable (if you have one).
heroku config:set HEROKU_API_KEY=`heroku authorizations:create --description "CronToGo" --short` -a <your-app-name>
At this point, you should be granted the ability to run Heroku CLI commands within the context of your app dyno. To ensure that it is working properly, run the following command:
heroku run -a <your-app-name> -- heroku cron -a <your-app-name>
If the output shows a list of your Cron To Go add-ons - score!
On the other hand, if the result output is an error, (e.g. bash: heroku: command not found or command cron:jobs not found), go back and double check that you’ve followed the steps specified above accordingly.
Step 3 - Create a manifest file and add it to your repo
To define your jobs, create a yaml configuration file in your local repo. Each job is described in the file, with the following attributes:
- Nickname - the name of the job.
- Schedule - the cron expression that defines the schedule for the job execution. Check out our Complete Guide to Cron Expressions, or Cron Expression To Go, our helper tool.
- Command - the command to execute (e.g. “python my-script.py”).
- Dyno - the dyno type to use when spawning the command in a one-off dyno.
- Timeout - the designated time to live for the one-off dyno, in seconds.
- Timezone - (optional, only works in certain plans) - defines the timezone to use in the schedule too (default is UTC).
- State - either ‘enabled’ or ‘paused’.
For the sake of this guide, we’ll assume we named it 'manifest.yml' and put it in your app’s root. Here’s a good example of such a yaml file:
jobs:
  - nickname: Every minute job
    timezone: 'UTC'
    schedule: '*/1 * * * *'
    command: 'echo "Every Minute Job"'
    dyno: 'Hobby'
    timeout: 300
    state: 'enabled'

  - nickname: Every day (at 09:00)
    timezone: 'America/New_York'
    schedule: '0 9 * * *'
    command: 'echo "Daily Job at 09:00"'
    dyno: 'Hobby'
    timeout: 300
    state: 'enabled'

  - nickname: Every month (on the 1st at 09:00)
    timezone: 'UTC'
    schedule: '0 9 1 * *'
    command: 'echo "Every month (on the 1st at 09:00)"'
    dyno: 'Hobby'
    timeout: 300
    state: 'paused'
Make sure to commit and push the file to Heroku:
git add manifest.yml
git commit -am “add cron to go manifest file”
git push heroku main
Step 4 - Add or edit your release phase script
Lastly, add a release phase script to clear your app’s job list and import the configuration from the manifest file.
The release phase allows you to run certain tasks before a new release of an app is deployed and is useful for things such as database migrations or updating background jobs. It is important to note that if a release phase task fails, the new release is not deployed, leaving the current release unaffected.
To add a release phase: add a line, such as the following, to your app’s Procfile:
release: ./release-tasks.sh
Create a bash file (release-tasks.sh) and add the following command to it. It uses the CLI plugin to delete all jobs that are already defined in your Cron To Go add-on, and then import the jobs defined in the manifest file:
heroku cron:jobs:import ./manifest.yml --app $HEROKU_APP_NAME --delete --confirm $HEROKU_APP_NAME
Again, commit the change and push it:
git add release-tasks.sh
git commit -am “add release phase”
git push heroku main
That’s it! You should be good to go. Anytime you need to make changes to your app’s jobs, be sure to edit the manifest file, commit your changes, and once they’ve been pushed to Heroku, your Cron To Go jobs will be updated together with your code.
If you have any further questions or feedback, please reach out to us via our in-app chat!


