
Have you ever wondered if it’s possible to automatically scale your app dynos up and down at specific hours or days using the Heroku CLI? It absolutely is!
By the end of this post, you will learn exactly how to schedule Heroku CLI commands to automate various tasks, including scaling dynos, backing up Heroku Postgres, and more.
Automating with Heroku CLI
Scaling dynos is just one of many possible actions available when scheduling Heroku CLI commands.
In addition, you can also restart dynos, run automated Heroku Postgres backups and restores, monitor long running processes, monitor blocked processes, send alerts regarding Postgres issues, or change your app configuration dynamically – all using Heroku CLI.
There are just a few useful actions, off the top of our heads, that can be automated using the Heroku CLI.
In this guide, we’ll go through the steps required to schedule Heroku CLI commands quickly and efficiently.
Let’s get started, shall we?
Step 1 - Adding the Heroku CLI Buildpack to Your Heroku App
First and foremost, you'll need to add the Heroku CLI buildpack to your app.
Heroku Buildpacks are sets of open-source scripts used for compiling apps on Heroku, which allow you to expand the libraries and commands available to your app. Ultimately, they give you access to convenient and efficient code in the language and framework options that suit you best.
The Heroku CLI (Command Line Interface) buildpack is used to manage Heroku apps from the command line and allows you to run the heroku CLI in your dyno context alongside your app code.
Before adding the Heroku CLI buildpack, please make sure you have it installed locally, as we’ll be using it to add the buildpack. Then, run the following commands in your terminal:
- Add an environment variable that contains your Heroku API key.
$ heroku config:set HEROKU_API_KEY=`heroku auth:token`
- Add the Heroku CLI buildpack to your app:
$ heroku buildpacks:add heroku-community/cli [-a <your-app-name>]
- Finally, push your local repo to heroku:
$ git push heroku master
This should now grant you the ability to run Heroku CLI commands within the context of your dyno. To ensure that it is working properly, run the following command:
$ heroku run 'heroku version'
If the output is the Heroku CLI version (e.g. heroku/7.47.5 darwin-x64 node-v12.16.2) - great job!
On the other hand, if there is a resulting/output error, (e.g. bash: heroku: command not found), go back and make sure you’ve done everything according to the steps specified above.
Step 2 - Install Cron To Go, the scheduler add-on
For a brief background on Cron, we’ve covered the basics. Cron is a time-based job scheduler used in *nix systems to automate and schedule repetitive tasks to run routinely at fixed times, dates, or intervals.
When it comes to a time-based job scheduler, Cron To Go provides you with a fully managed, accurate, reliable, flexible, and scalable cloud solution.
Cron To Go’s Heroku add-on allows you to utilize cron expressions when scheduling and automating tasks, track job execution, and receive email and webhook notifications regarding job status.
To install it in your app, you can use the option of the Heroku CLI:
heroku addons:create crontogo
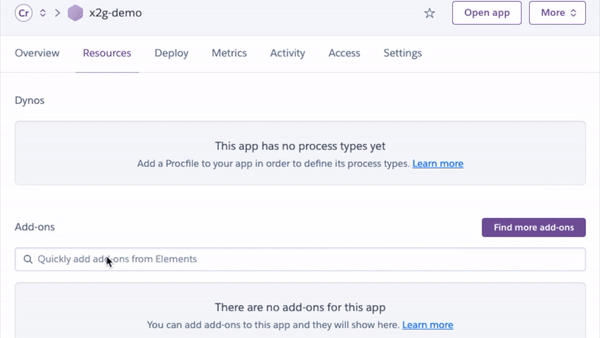
Another option is to follow these steps through the UI:
- Go to your app dashboard.
- Click the resources tab.
- Type in cron to go under the addons section.
- Choose your plan and click submit order form.
It’s quick and simple, look for yourself:
Step 3 - Add a job to automate your Heroku CLI
Now that you’ve got Cron To Go ready at your command, it’s time to put it to work and get some jobs going. In the following example, we’ll be adding 2 jobs which automatically scale dynos up in the morning and down in the evening for an imaginary app that’s used only during workdays.
Open Cron To Go’s dashboard via your Heroku app dashboard or by using the following command line:
$ heroku addons:open crontogo
Opening crontogo for sharp-mountain-4005
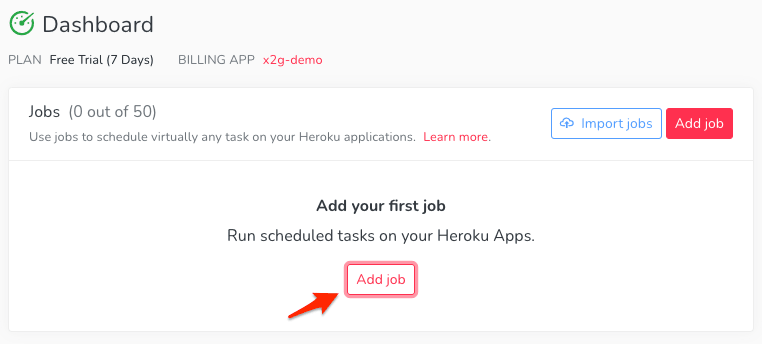
Next, click the little pink Add job button located right in the middle of the page:
Name the first job “Dyno scale down” and use the following cron expression and command:
- Cron expression:
0 18 * * 1-5 - Command:
heroku dyno:scale web=1:Standard-1X
This job will run on weekdays (Monday to Friday) at 6pm and scale the app down to 1 Standard-1X dyno.
Click Add job to add this job and create another job. This time, name it “Dyno scale up” and use the following cron expression and command:
- Cron expression:
0 9 * * 1-5 - Command:
heroku dyno:scale web=3:Standard-1X
This job will run on weekdays (Monday to Friday) at 9am and scale the app up to use 3 Standard-1X dynos.
This way, you can save a whopping 57% of your dyno costs by running 2 of your 3 dynos for 9 hours a day (and only on weekdays since they like their weekends off too!), while still providing some availability during off-hours and weekends with a single dyno.
Update existing jobs without losing job history
If you’re making updates to existing jobs, you don't need to delete and recreate them, which would lose all the previous execution history.
Instead, you can export jobs with their job IDs using the command heroku cron:jobs:export FILENAME --with-id and then import the updated jobs using their IDs to retain the history.
You can learn more about this feature Here.
In conclusion
A whole new world of scheduling commands is now at your disposal with the Heroku CLI.
Use this powerful tool to automate tasks, scale your applications efficiently, and keep your processes running smoothly.
Also, be sure to further enhance your automation capabilities by adding Cron To Go–for seamless job scheduling and management.
If you have any questions or suggestions in mind (or would just like to share your experience with Heroku CLI commands), do not hesitate to reach out to us via the chat button.
Post photo by NeONBRAND on Unsplash
Frequently Asked Questions
What is the Heroku CLI used for?
The Heroku CLI (Command Line Interface) is used to manage Heroku apps directly from the command line. It allows you to perform tasks such as scaling dynos, managing add-ons, running database backups, and deploying applications.
How do I install the Heroku CLI?
To install the Heroku CLI, you can download it from the official Heroku website. Follow the installation instructions for your operating system, and then verify the installation by running heroku --version in your terminal.
How do I schedule tasks using the Heroku CLI?
To schedule tasks using the Heroku CLI, you can use add-ons like Cron To Go. First, install the Heroku CLI buildpack and the Cron To Go add-on, then set up your scheduled tasks using cron expressions.
Can I automate Heroku Postgres backups with the Heroku CLI?
Yes, you can automate Heroku Postgres backups with the Heroku CLI by scheduling the backup commands using a cron job. This ensures your database is regularly backed up without manual intervention.